Audinux
A Fedora COPR repository for Audio creation
Getting Started with Audinux
Table of Content
-
Practical audio routing and monitoring
The goal is to help new users get sound working first, then gradually explore the deeper features of the system.
-
From input (mic or instrument) to output (speakers/headphones), understand how audio flows in a basic setup using Carla.
-
You’ve explored the essentials with Audinux. It is time to start building your audio workflow.
Audinux: Fedora Audio Production Environment
Audinux is a Fedora COPR repository designed to provide a complete audio production environment on Fedora. Audinux maintains the latest upstream versions of audio packages to ensure users have access to the most up-to-date features and fixes. Below is a categorized summary of the main software available in Audinux:
Plugin Hosts and Session Management
- Carla: A modular plugin host that supports LV2, VST, and LADSPA plugins.
- Ray Session: A session manager for JACK that allows you to save and restore the state of multiple audio applications.
Audio Plugins and Effects
- LADSPA, LV2, VST Plugins: A wide selection of audio effects and virtual instruments, including plugins from Calf Studio Gear, x42, LSP, and Airwindows.
Digital Audio Workstations (DAWs)
- Ardour: A professional-grade DAW for audio and MIDI editing.
- LMMS: A DAW well-suited for electronic music production, focused on sample-based workflows.
Modular Systems
- VCV Rack: A virtual modular synthesizer that allows patching together various modules to create sound.
- Cardinal: A standalone and plugin version of VCV Rack, optimized for integration with DAWs and plugin hosts.
Guitar and Amp Simulation
- Guitarix: A virtual guitar amp and effects simulator with a wide range of customization options.
- AIDA-X, NAM: AI-powered amp modeling tools that replicate the sound of real amplifiers.
Synths and Samplers
- ZynAddSubFX, Surge: Versatile synthesizers with a broad palette of sounds.
- SFZ / SF2 Players: Sampler engines that support SoundFont files for instrument playback.
Spectrum Analyzer
- LSP Spectrum Analyzer: You can connect LSP Analyzer in LV2 format to Ardour or Carla to receive real-time feedback during mixing.
Audio Signal Visualisation and Measurement
- VAMP: An audio processing plugin system for plugins that extract descriptive information from audio data — typically referred to as audio analysis plugins or audio feature extraction plugins.
- Sonic Visualiser: A program for highly configurable detailed visualisation, analysis, and annotation of audio recordings.
Practical Audio Routing and Monitoring
Table of Contents
- Introduction
- Why Routing and Monitoring Matter
- Basic Setup with Carla
- Using Carla’s Patchbay for Visual Audio Routing
- Case Study: Podcast Workflow
- Case Study: Guitar Monitoring with AI Amp Modelling
- Realtime Analysis: LSP Spectrum and Metering Tools
- Summary
Introduction
This guide demonstrates how to set up a flexible audio routing and monitoring environment on Fedora using tools provided by Audinux. Whether you’re a podcaster, musician, or voice-over artist, understanding signal flow and real-time monitoring is crucial.
Why Routing and Monitoring Matter
Proper audio routing allows you to:
- Separate dry/wet signals
- Apply effects without destructive processing
- Monitor your signal path in real-time
- Detect audio issues early through analyzers
Basic Setup with Carla
Carla is a powerful modular plugin host. It’s especially useful for setting up your audio environment graphically with JACK.
Steps:
- Launch Carla and enable JACK backend.
- Add plugins (Example: EQ, compressor).
- Connect your microphone input → plugin chain → a DAW like Ardour for recording, or directly to system playback.
Example:
[Mic Input] → [LSP Compressor (LV2)] → [LSP Parametric EQ (LV2)] → [Ardour Track Input]
Using Carla’s Patchbay for Visual Audio Routing
The Patchbay in Carla allows you to visually connect audio inputs and outputs between devices, plugins, analyzers, and monitoring endpoints. This graphical interface is ideal for setting up complex signal chains with real-time control.
Example Workflow: Vocal Monitoring with Real-time Analysis
Objective: Route microphone input through effects, analyze the signal, and monitor the output via headphones.
Steps:
- Launch Carla and switch to the Patchbay tab.
- Connect your USB microphone (or input device) to a plugin for processing.
- Chain your effects plugins, such as EQ or compression.
- Route the output to analyzer plugins, like:
LSP Spectrum Analyzer(LV2) — visualizes frequency responsex42 Stereo Meter— shows stereo balance and peak levels
- Send the analyzed and processed signal to your monitoring output, (headphones or system playback).
Routing Example:
- Input: Connect your microphone to an input channel in Carla.
- Processing: Add LV2 plugins (e.g., EQ, compressor) to process the input signal.
- Analysis: Route the output to LSP Spectrum Analyzer and x42 Stereo Meter for real-time visual feedback.
- Monitoring: Send the processed signal to headphones or system playback.
Each node in Carla’s Patchbay represents a JACK client or port. Simply click and drag connections between them to build your signal chain. This setup provides precise control and immediate visual feedback, ideal for recording or live use.
Case Study: Podcast Workflow
Goal: Apply compression and EQ to voice while monitoring with real-time spectrum analysis.
Steps:
-
Input:
USB microphone - Processing Chain:
LSP Compressor (LV2)– dynamic control of voice levelsLSP Parametric EQ (LV2)– clean up and enhance voice tone
-
Analysis:
LSP Spectrum Analyzer (LV2)– monitor vocal spectrum in real time - Output:
- Route to
Ardourfor multi-track recording
or - Route to
system:playback(via JACK or PulseAudio bridge) for live monitoring
- Route to
This workflow is built in Carla with the JACK backend. All plugins are available via the Audinux COPR repository.
Case Study: Guitar Monitoring with AI Amp Modelling
Goal:
Set up a guitar sound using AI-based amp modeling, allowing for real-time playing and recording.
Steps:
-
Input:
Connect your guitar to a USB audio interface. - Processing Chain:
- Use the
NAM Loaderplugin (Neural Amp Modeler) in Guitarix to load an AI-based amp model. - Optionally add distortion plugins like
Tube ScreamerorRat. - Finish the tone with cabinet emulation and reverb plugins.
- Use the
- Output:
- Record in a DAW like Ardour,
- or monitor in real time via
system:playback.
Note:
This setup is typically built using Carla with the JACK backend. All plugins are available via the Audinux COPR repository.
For a more detailed guide and background, see Yann Collette’s article:
Using Artificial Intelligence to Set a Guitar Sound
Realtime Analysis: LSP Spectrum and Metering Tools
LSP Plugins (LV2) include a set of high-quality analysis tools for real-time visual monitoring during mixing or recording.
These tools provide visual feedback on:
- Frequency Spectrum (Example: LSP Spectrum Analyzer)
- Stereo Image (Example: LSP Phase Meter)
- Loudness and Levels (Example: LSP Multiband Analyzer)
Use Cases:
- Evaluating your final mix
- Live monitoring during recording or streaming
- Ensuring a balanced stereo field and avoiding clipping
Summary
Audinux provides a robust and modular toolkit for managing audio routing and monitoring workflows. By combining Carla, JACK, and powerful analyzer plugins, you can build a flexible and efficient audio environment tailored to your creative and technical needs.
Understand Your Voice Chain
Introduction to important aspects of voice processing
The voice chain is the signal path from the microphone to the final output, which often includes various stages such as EQ, compression, and monitoring. Understanding each component and how they work together is crucial for achieving optimal sound quality in your recordings. In this guide, we’ll explore the essential stages of a voice chain and how you can use them to enhance your vocal recordings.
1. Making Your Sound - Hardware and Carla Setup
This section focuses on the physical setup (microphone selection and audio interface), followed by the routing of the voice through Carla. The key idea is to create a good starting point with solid hardware and ensure the signal is correctly routed within Carla(
Elaboration: What Is a Voice Chain?
In audio production, a voice chain refers to the series of audio processing stages your vocal signal passes through — from the microphone input, through various effects (plugins), until it reaches the final output. Each stage shapes or controls the sound for clarity, consistency, and musicality.
Unlike instrument chains or MIDI-based setups (which are very popular topics in the Linux audio community, especially around synths, guitars, or modular setups), a voice chain is unique because:
-
Voice is highly dynamic and varies greatly between speakers.
-
Human hearing is especially sensitive to vocal nuances (dynamic swings, breathing noise, plosives).
-
Real-time monitoring is often more critical (you hear yourself through the chain during recording).
-
Low latency and clean dynamics are much more important than modulation or creative effects.
In short:
- Voice chains prioritize intelligibility, warmth, and musical expression.
- Instrument chains often prioritize tone shaping, effects layering, and creative sound design.
That’s why focusing on the voice chain offers a super practical guide for:
-
Podcasting
-
Voice-overs
-
Singing
-
Online meetings or live streaming
To begin building a solid voice chain, the first step is setting up the hardware and ensuring the appropriate software routing in Carla. Here’s how you can do this effectively.
Choosing the Right Hardware
The foundation of your voice chain starts with your microphone and audio interface. The quality of your hardware will significantly affect the final result. Common setups include:
- Microphone: A dynamic or condenser microphone is essential, depending on your recording environment.
- Dynamic mics are ideal for controlling background noise and handling high-volume sounds.
- Condenser mics capture detailed sound, perfect for a controlled, quiet environment.
- Audio Interface: Ensure your audio interface is compatible with your system and supports low-latency processing. Popular choices include Focusrite Scarlett, PreSonus AudioBox, and Behringer UMC series.
Understanding Engine Processing Mode vs Interface Modes (Rack/Patchbay) in Carla
Once your hardware is set up, you can use Carla to route audio to and from your recording environment. Carla is a flexible, modular audio plugin host designed for real-time audio routing and plugin management. Carla gives you direct visual control over how your hardware, software instruments, and effects are connected.
-
Engine processing mode: This setting (visible under Engine settings) defines how Carla communicates with JACK. Carla’s default Multi-client (JACK) mode lets each plugin act as an independent JACK client, making it easy to route audio freely between plugins, hardware, and other software.
-
Rack/Patchbay mode controls how Carla manages plugins internally.
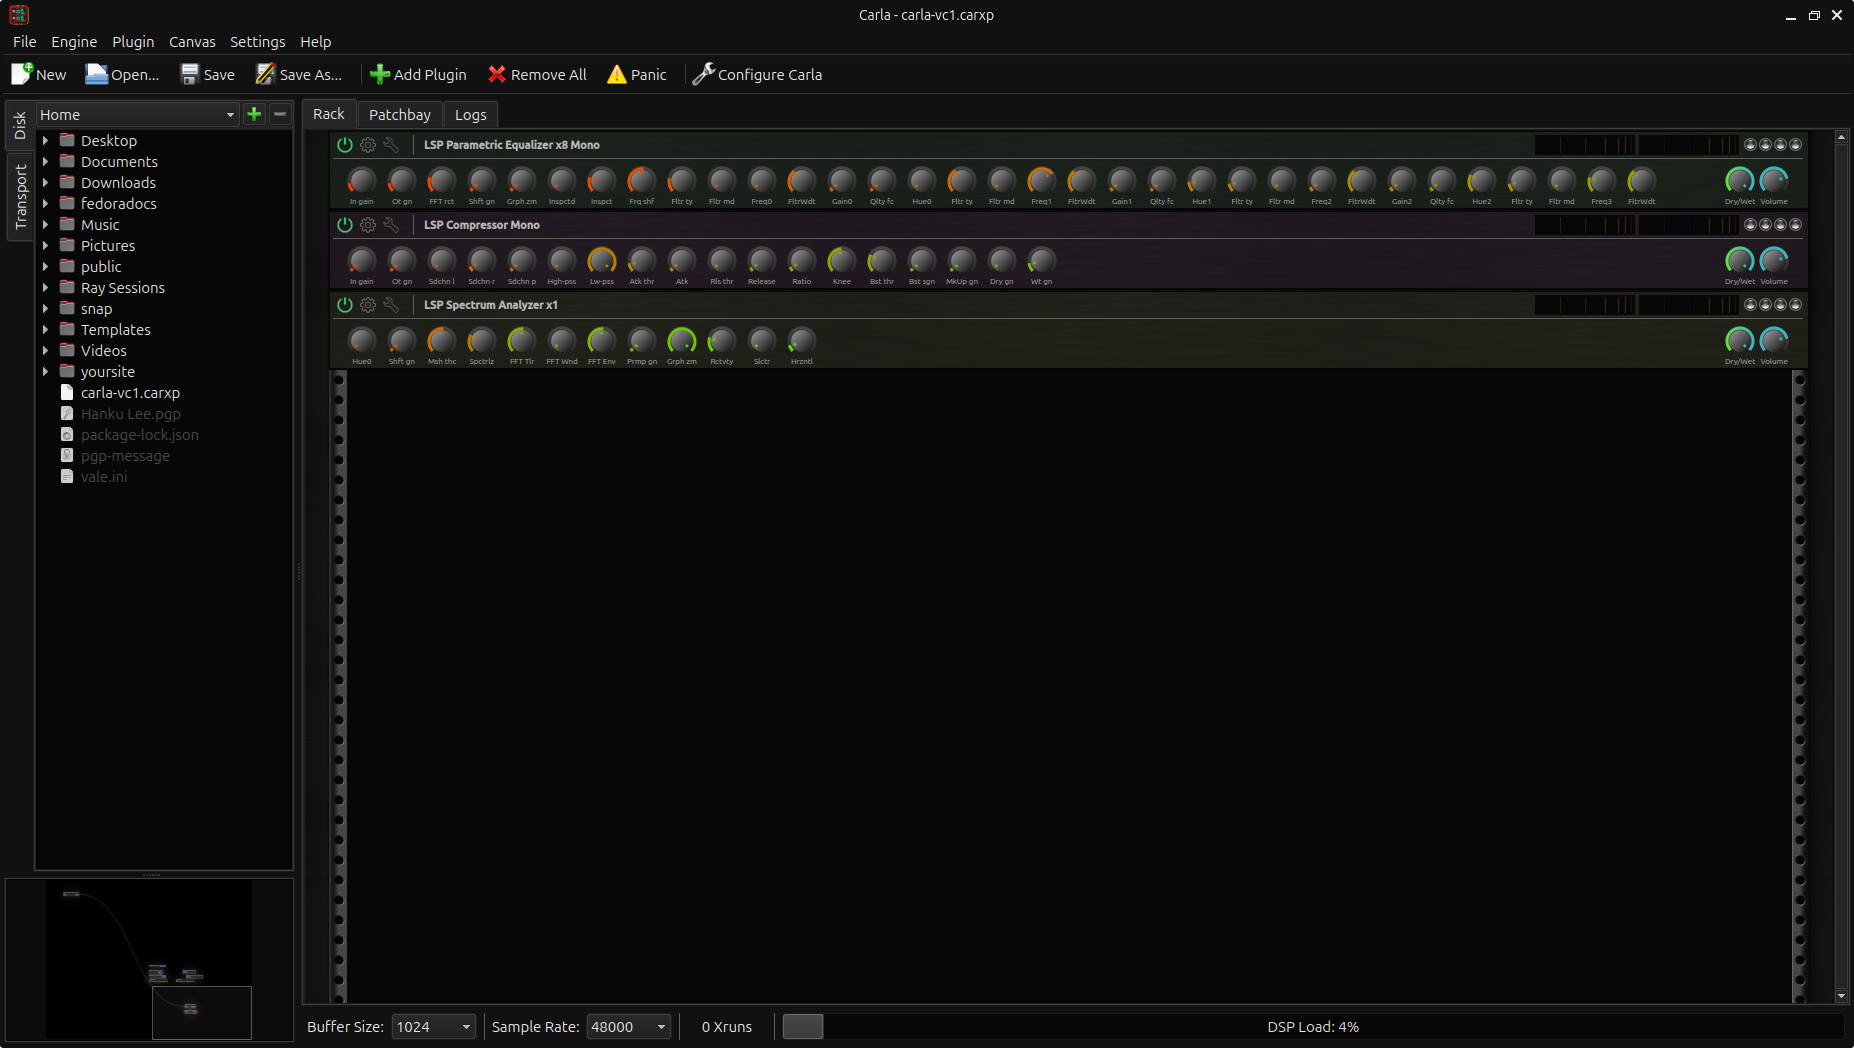
- Rack: Simple, serial connection (one plugin into the next). Simpler chains, tweaking sound inside plugins. Plugins are processed in order, from top to bottom. Rack mode allows you to open each plugin’s full GUI (graphical interface) to adjust parameters like EQ curves, compressor thresholds, reverb settings.
The following image demonstrates typical Graphical User Interface (GUI) of the Carla Rack:
- Patchbay: Full audio graph, mixing external hardware and software
Best for: Complex signal chains, live performance setups, combining software and external gear. The Patchbay canvas in Carla gives you a visual way to connect plugins, hardware, and system inputs/outputs like building blocks.
The following image demonstrates typical Graphical User Interface (GUI) of the Carla Patchbay Canvas:
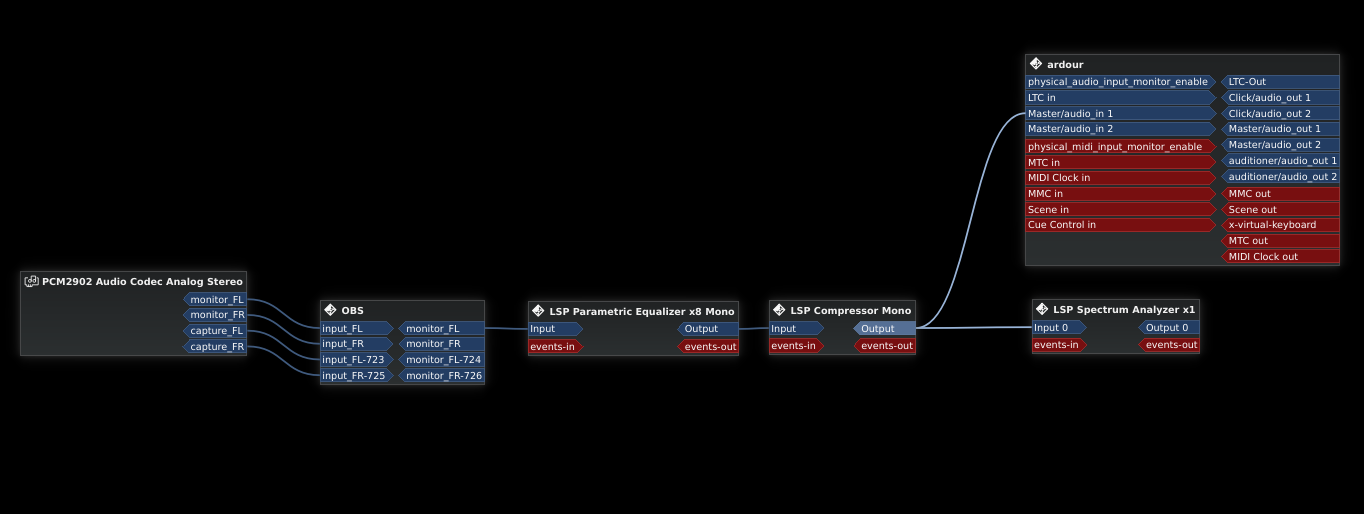
In/Out Ports (Audio Ports) represent audio signals entering or leaving a particular device or plugin.
2. Shaping Your Sound - Using LSP for Real-time Analysis and Refining:
This section introduces LSP (Linux Studio Plugins) as essential tools for shaping the sound of your voice. The emphasis is on using EQ to refine the sound and the LSP Spectrum Analyzer for real-time feedback, enabling users to monitor and adjust the voice chain during the recording or live monitoring process.
Purpose of EQ
EQ (Equalization) is used to shape the frequency response of your voice by boosting or cutting specific frequencies. Proper EQ can make your voice sound clearer, fuller, or more present, depending on your needs.
The following image demonstrates typical Graphical User Interface (GUI) of the LSP Parametric EQ:
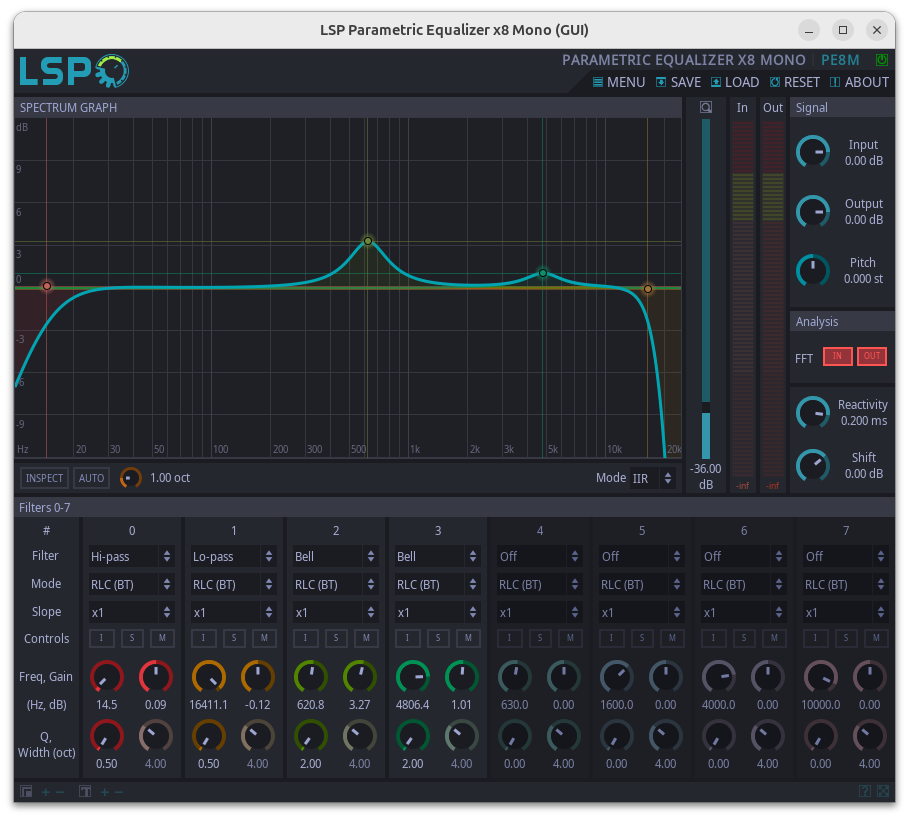
The LSP Parametric Equalizer x8 Mono gives you 8 frequency bands to work with, which offers plenty of flexibility to shape the sound of a mono source. This makes it ideal for solo recordings or a single microphone setup (for instance, a voice-over recording or an acoustic guitar mic’d up in a simple setup).
How users adjust Key Controls inside LSP plugins
Purpose: Determines the central frequency for each band. You can adjust where the EQ will target specific frequencies on the spectrum.
-
Load the EQ plugin in Carla (Example: LSP Parametric Equalizer x8 Mono). Right-click on the plugin block, select Enable, and make sure the plugin’s name (such as ‘LSP Parametric Equalizer x8 Mono’) is visible.
-
Common Adjustment:
-
Low-End: Set around 80–100 Hz to cut off unwanted rumble (High-Pass).
-
Midrange: Set around 250–1,000 Hz for controlling muddiness or boosting clarity.
-
High-End: Set around 4–12 kHz for boosting presence or adding air to the voice.
-
How to Adjust: Click and drag the Frequency knob left or right. You’ll see the frequency change in Hz. Alternatively, you can also adjust the EQ by clicking and dragging a frequency point upward or downward directly on the graph. Dragging upward boosts the selected frequency, while dragging downward cuts it.
A/B test your changes: Bypass
In audio processing, a dry signal is the original, unprocessed sound, while a wet signal is the sound after it has been processed with effects like EQ, compression, or reverb. Imagine recording your voice with a microphone. The raw recording, without any effects, is the dry signal. If you add compression to control the dynamics and a bit of reverb to make it sound fuller, the result is the wet signal.
The following image demonstrates typical Graphical User Interface (GUI) of the bypass option on LSP plugins:
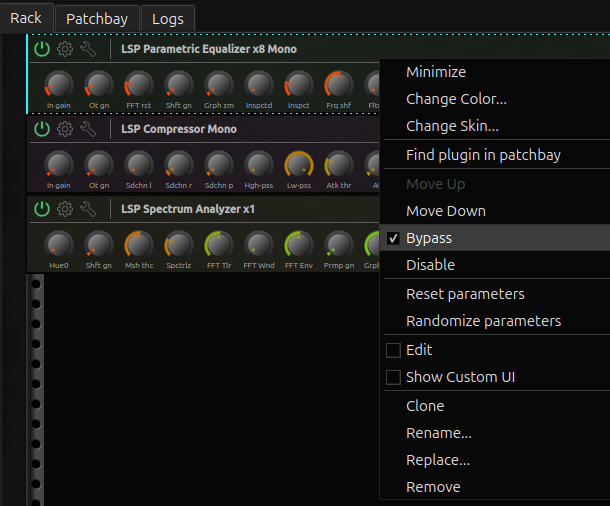
Right-click on the rack window of a plugin and tick the checkbox of ‘bypass’.
Always A/B test your changes. Bypass the EQ and listen to how your voice sounds without it, then engage the EQ and listen again. Make sure you’re not over-processing your voice.
Purpose of Compression
Compression controls the dynamic range of your voice, ensuring that quieter parts are brought up in volume while loud parts are reduced. This results in a more consistent sound level throughout your recording.
The following image demonstrates typical Graphical User Interface (GUI) of the LSP Compressor plugins:
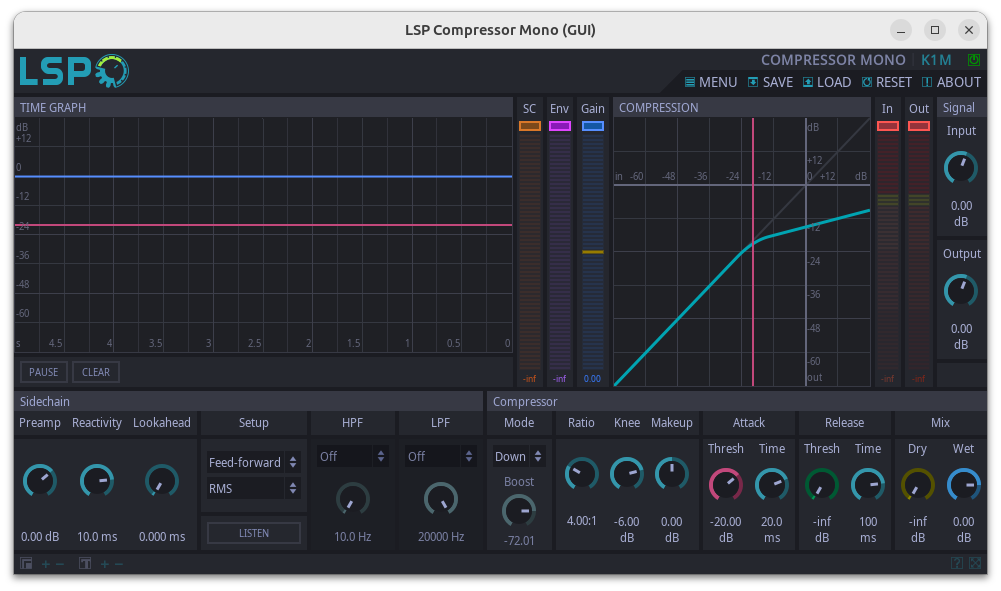
Typical Compression Settings
- Threshold: Set the threshold to -20 dB to compress only the louder parts.
- Ratio: Use a ratio of 3:1 or 4:1 for subtle compression.
- Attack: Set a medium attack time (10-30 ms) to let transients pass through without distortion.
- Release: Set a medium release time (100-200 ms) to smoothly return to normal after compression.
3. Save configuration
To save a configuration in Carla, you can use a .carxp file, which stores the setup of your patchbay, including all audio and MIDI routing, plugin settings, and connections. This file allows you to quickly restore your exact setup for future sessions without needing to manually reconfigure everything. To save a configuration, simply go to the File menu in Carla, choose Save Configuration As, and select the destination where you want to store your .carxp file. This file will contain all the details about your current patchbay, including the arrangement of plugins, the routing between them, and any device or system parameters. When you want to load the configuration later, you can open the .carxp file, and Carla will automatically restore your entire environment, making it a convenient and efficient way to manage your workflow.
4. Monitoring and Real-time Feedback
LSP Spectrum Analyzer x1
x1 is simple, lightweight, perfect for voice work. Mono matches your voice chain since microphone is usually mono.
The following image demonstrates typical Graphical User Interface (GUI) of the LSP Spectrum Analyzer:
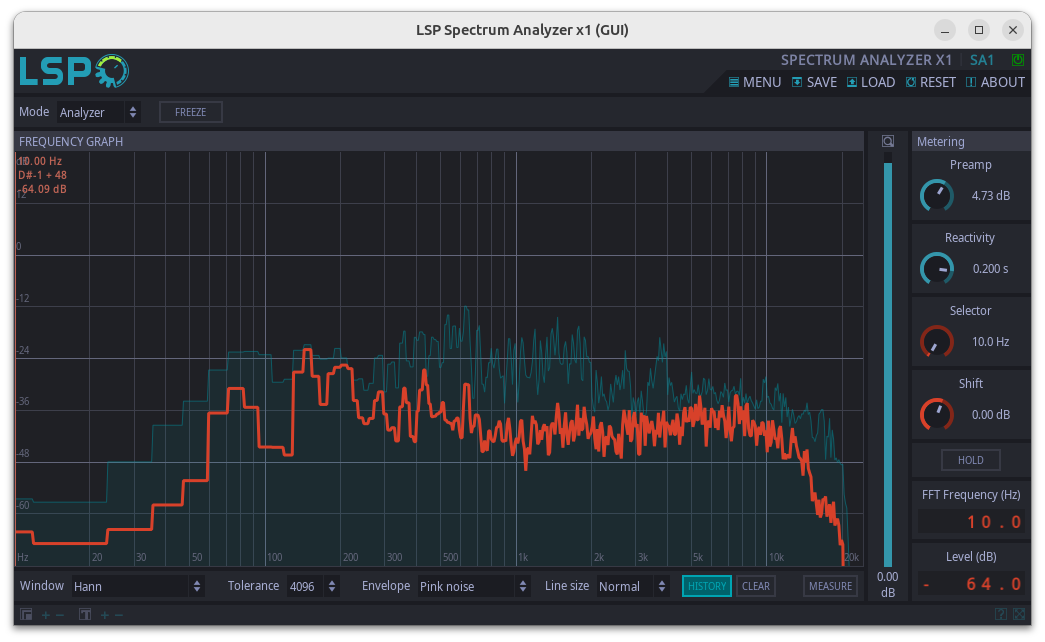
Setting up Monitoring
- Route the microphone input through your EQ and compressor chain.
- In Carla, click on the plugin’s wrench icon or double-click the LSP Spectrum Analyzer node.
- Speak into the mic or make any sound. Listen to the output through headphones to ensure the quality and balance of your voice.
- You’ll see movement mostly between 100Hz and 3000Hz on the spectrum.
- Sing a short melody — it can be humming or a line with lyrics.
- Singing introduces dynamic volume changes and pitch variations. On the spectrum analyzer, you’ll see a wider frequency range being activated, not just speech-focused areas.
Singing helps you detect how plugins (especially EQ and compression) react to dynamic shifts and emotional expression. You can also catch subtle issues like breath noise or high-frequency peaks that don’t always show up during normal speaking.
5. Common Issues and Troubleshooting
Overcompression
- If your voice sounds squashed or unnatural, the compression ratio might be too high. Reduce the ratio or adjust the threshold to allow more dynamics.
Harsh Highs
- If your voice sounds too harsh or brittle, try reducing the high-mid frequencies (around 2-4 kHz) using EQ.
Muddiness
- If your voice sounds muddy, check for excessive low-mid frequencies (around 200-400 Hz) and cut them slightly to clean up the sound.
6. Conclusion
Understanding your voice chain is essential for achieving the best possible sound quality in your recordings. By using EQ, compression, and monitoring tools correctly, you can shape and control your voice to suit your needs, whether for podcasts, voice-overs, or music recordings.
Key Takeaways
- EQ helps shape your voice by adjusting frequencies.
- Compression ensures your voice is consistent in volume.
- Monitoring tools help you visualize and analyze your voice in real-time.
With a solid understanding of these tools and techniques, you can improve the quality of your voice recordings and achieve professional-sounding results.
Additional Resources
- LSP(Linux Studio Plugins) - Learn more about LSP’s basic controls and elements of plugin’s UI.
Build Your Audio Workflow
You have explored the essentials with Audinux. Your next steps can align with your creative goals, whether recording a podcast, building live setups, experimenting with plugin chains, or diving into full multi-track production. Audinux gives you a modular foundation, but your journey continues with tools like Ardour, Pipewire-jack, and advanced plugin workflows. Your path depends on how deep you want to go - performance, production, or precision mixing. You’re not just using tools now. You’re shaping your audio environment.
Audinux offers opportunities with open-source tools: you’ve already explored plugin hosting, routing, and monitoring. The next step is personal—build a repeatable workflow, trust your ears, and keep it simple at first. As with any creative tool, familiarity grows with use. Audinux doesn’t aim to mimic commercial DAWs—it gives you the freedom to shape your sound, in your way.
Additional Resources
-
Ardour Tutorial - Learn more about recording and editing audio on Linux. It covers setup, basic workflows, and essential tools in a concise format, making it ideal for newcomers.
-
Latency Tuning - Low-latency audio is key to real-time performance and smooth monitoring. Achieving it on Linux involves choosing the right kernel (often low-latency or real-time), tuning buffer sizes, and ensuring your system isn’t introducing unnecessary delays. Tools like JACK or PipeWire allow fine-grained control, and using interfaces with solid driver support helps. For a practical approach, including how AI can even help dial in guitar tones with low latency, check out the Fedora Magazine article on latency tuning.